.NET Authentication with EF Core, Identity and DB2 for i (IBM i)
Introduction
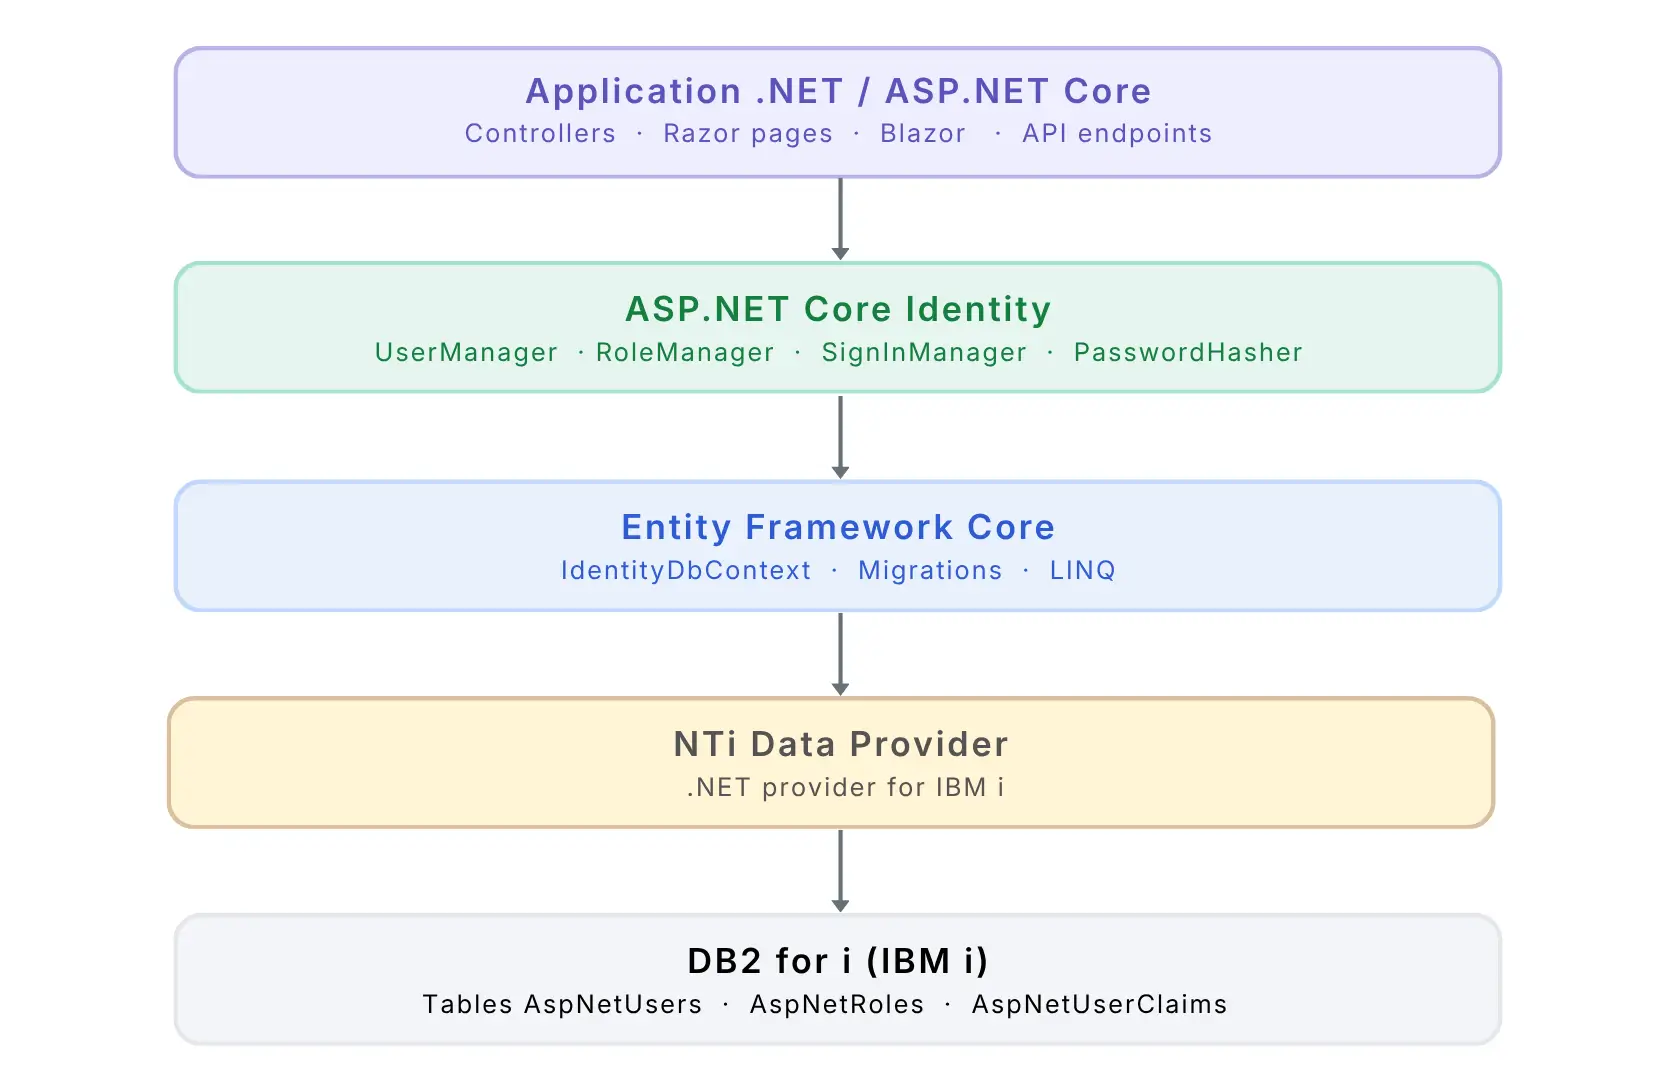
ASP.NET Core Identity is the authentication system built into .NET. It handles registration, login, password hashing, roles and route protection, all out of the box. Login, registration, account management and password reset pages... everything is automatically generated and ready to use.
By default, Identity requires an EF Core-compatible provider to store its data, such as SQL Server, PostgreSQL, SQLite... With the NTi Entity Framework Core extension, you can use DB2 for i as your storage backend.
Microsoft Identity relies on EF Core to persist its data to the database, and that is exactly the entry point NTi leverages to redirect storage to your IBM i.
This tutorial walks you through setting up Identity in a Blazor Server application, with user tables automatically created in a DB2 for i library via EF Core migrations.
Prerequisites
- .NET SDK 8
- Visual Studio 2022 or equivalent
- Microsoft.EntityFrameworkCore.Design version 8.0.X
Step 1 - Create the project
Create a new empty Blazor Web App project in .NET 8:
dotnet new blazor -n NtiIdentityDemo -f net8.0 --empty
cd NtiIdentityDemo
💡 If you are using Visual Studio, create a Blazor Web App project, select .NET 8 as the framework, Server as the render mode.
Step 2 - Install NuGet packages
Four packages are required, each with a specific role:
dotnet add package Aumerial.Data.Nti
dotnet add package Aumerial.EntityFrameworkCore
dotnet add package Microsoft.AspNetCore.Identity.EntityFrameworkCore --version 8.0.*
dotnet add package Microsoft.EntityFrameworkCore.Design --version 8.0.*| Package | Role |
|---|---|
Aumerial.Data.Nti |
TCP/IP connection to IBM i |
Aumerial.EntityFrameworkCore |
EF Core extension for DB2 for i |
Microsoft.AspNetCore.Identity.EntityFrameworkCore |
Bridge between Identity and EF Core |
Microsoft.EntityFrameworkCore.Design |
Migration tooling (dotnet ef) |
💡 The
Identity.EntityFrameworkCoreandEntityFrameworkCore.Designpackages must be version 8.0.X to ensure compatibility withAumerial.EntityFrameworkCoreand .NET 8.
Step 3 - Create the Data folder
Create a Data/ folder at the root of the project. It will contain the two classes required for Identity to work with EF Core.
Data/ApplicationUser.cs
ApplicationUser is the class that represents a user in your application. It inherits from IdentityUser, which already includes all the required fields: identifier, username, email, password hash, and so on.
using Microsoft.AspNetCore.Identity;

namespace NtiIdentityDemo.Data
{
    public class ApplicationUser : IdentityUser
    {
    }
}
For now it is empty, and that is perfectly fine. If you need to store additional information about your users (first name, last name, department...), this is where you will add it:
public class ApplicationUser : IdentityUser
{
    public string? LastName { get; set; }
    public string? FirstName { get; set; }
}
💡 Each property added here will become a column in the
ASPNETUSERStable in DB2 for i. A new migration will be required to apply the change to the database.
Data/AppDbContext.cs
DbContext is the class that bridges your C# code and the database. It knows which tables exist, how to convert your C# objects into data that DB2 for i can work with, and how to execute queries through NTi.
Instead of inheriting from the standard DbContext, we inherit from IdentityDbContext<ApplicationUser>. This specialized context automatically includes all the DbSet entries Identity needs, so there is no need to declare them manually:
using Microsoft.EntityFrameworkCore;
using Microsoft.AspNetCore.Identity.EntityFrameworkCore;

namespace NtiIdentityDemo.Data
{
    public class AppDbContext : IdentityDbContext
    {
        public AppDbContext(DbContextOptions options) : base(options)
        {
        }
    }
} | DbSet | Table created in DB2 for i |
|---|---|
DbSet<ApplicationUser> |
ASPNETUSERS |
DbSet<IdentityRole> |
ASPNETROLES |
DbSet<IdentityUserRole> |
ASPNETUSERROLES |
DbSet<IdentityUserClaim> |
ASPNETUSERCLAIMS |
DbSet<IdentityUserLogin> |
ASPNETUSERLOGINS |
DbSet<IdentityUserToken> |
ASPNETUSERTOKENS |
DbSet<IdentityRoleClaim> |
ASPNETROLECLAIMS |
Step 4 - Configure the connection string
In appsettings.json, add your NTi connection string:
{
  "ConnectionStrings": {
    "DefaultConnection": "server=SERVER;user=USER;password=PWD;schema=IDENTITYDB;"
  }
}
The schema parameter refers to the DB2 for i library where the Identity tables will be created. If the library does not exist, EF Core will create it automatically during migration.
For the full list of available parameters, see the NTiConnection class.
💡 IBM i library names are limited to 10 characters. Make sure to respect this constraint in the
schemaparameter.
Step 5 - Generate the Identity components
Identity Razor components (login, registration, account management pages...) can be automatically generated through Visual Studio scaffolding.
- Right-click on the Components folder of your project
- Select Add > New Scaffolded Item > Blazor Identity
- Configure the options:
- DbContext class: select
AppDbContext - User class: select
ApplicationUser
- DbContext class: select
- Click Add
Visual Studio automatically generates the Identity Razor components in the Components/Account/Pages/ folder:
Login.razor- login formRegister.razor- registration formLogout.razor- logoutManage/- profile, password and 2FA management...
It also generates several utility files in Components/Account/ required for the Identity components to work properly, as well as an automatically updated Program.cs.
💡 The project must compile without errors after scaffolding. If
ApplicationUseris not recognized in some of the generated files, make sure theNtiIdentityDemo.Datanamespace is properly referenced in the relevantusingdirectives.
Step 6 - Configure Program.cs
The scaffolding generated a Program.cs configured for SQLite. Only one change is needed: replace UseSqlite with UseNTi to connect to the DB2 for i database through NTi Data Provider.
Replace the line:
builder.Services.AddDbContext(options =>
    options.UseSqlite(connectionString));
With:
builder.Services.AddDbContext(options =>
    options.UseNTi(connectionString));
And add using Aumerial.EntityFrameworkCore; at the top of the file.
The final Program.cs should look like:
using Aumerial.EntityFrameworkCore;
using Microsoft.AspNetCore.Components.Authorization;
using Microsoft.AspNetCore.Identity;
using NtiIdentityDemo.Components;
using NtiIdentityDemo.Components.Account;
using NtiIdentityDemo.Data;

var builder = WebApplication.CreateBuilder(args);

var conn = builder.Configuration.GetConnectionString("DefaultConnection");

// DbContext registration with NTi
builder.Services.AddDbContext(options =>
    options.UseNTi(conn));

builder.Services.AddRazorComponents()
    .AddInteractiveServerComponents();

builder.Services.AddCascadingAuthenticationState();
builder.Services.AddScoped();
builder.Services.AddScoped();
builder.Services.AddScoped();

builder.Services.AddAuthentication(options =>
    {
        options.DefaultScheme = IdentityConstants.ApplicationScheme;
        options.DefaultSignInScheme = IdentityConstants.ExternalScheme;
    })
    .AddIdentityCookies();

builder.Services.AddIdentityCore(options => options.SignIn.RequireConfirmedAccount = true)
    .AddEntityFrameworkStores()
    .AddSignInManager()
    .AddDefaultTokenProviders();

builder.Services.AddSingleton, IdentityNoOpEmailSender>();

var app = builder.Build();

if (!app.Environment.IsDevelopment())
{
    app.UseExceptionHandler("/Error", createScopeForErrors: true);
    app.UseHsts();
}

app.UseHttpsRedirection();
app.UseStaticFiles();
app.UseAntiforgery();

app.MapRazorComponents()
    .AddInteractiveServerRenderMode();
app.MapAdditionalIdentityEndpoints();

app.Run();
AddDbContext with UseNTi is the only place where NTi comes into play.
Everything else in Program.cs is standard .NET code generated by the scaffolding. UseNTi simply replaces UseSqlite to redirect storage to DB2 for i.
Step 7 - Create and apply the migration
This is where the Identity tables will be created in the DB2 for i database.
Generate the migration
EF Core analyzes AppDbContext and generates the required SQL instructions:
dotnet ef migrations add InitialIdentityA Migrations/ folder appears in your project. It contains the migration file describing the 7 Identity tables to be created.
Apply the migration to IBM i
NTi connects to your IBM i and executes the instructions:
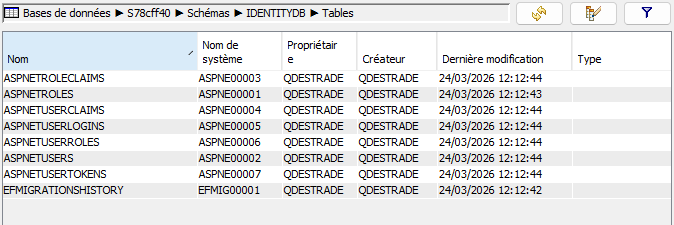
dotnet ef database updateThe 7 Identity tables appear in it, along with an EFMIGRATIONSHISTORY table that EF Core uses to track applied migrations.
You can verify the result in ACS (IBM Access Client Solutions) by opening the IDENTITYDB library.
💡 Migrations are incremental. The first migration creates all the tables. Subsequent ones only apply what has changed. If you add properties to
ApplicationUser, a new migration will create the corresponding columns inASPNETUSERSwithout affecting existing data.
Step 8 - Test Identity authentication
To validate that everything works, add @attribute [Authorize] in Components/Pages/Home.razor to protect the home page:
@page "/"
@attribute [Authorize]

<PageTitle>Home</PageTitle>

<h1>Welcome</h1>
<p>You are logged in!</p>
💡
[Authorize]tells Blazor that this page is only accessible to authenticated users. Any unauthenticated user is automatically redirected to the login page.
If [Authorize] is not recognized, add this using in Components/_Imports.razor:
@using Microsoft.AspNetCore.AuthorizationLaunch the application and follow these steps to validate the authentication service:
- You are automatically redirected to /Account/Login.
- Click "Register as a new user" and create an account.
- After registration, click the confirmation link in the URL to validate the account.
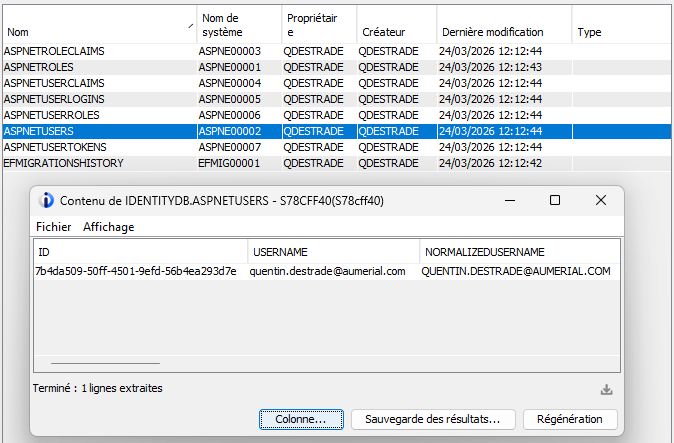
- Go back to /Account/Login and log in: you are redirected to the home page, authentication is working.
Open ACS and check the ASPNETUSERS table in the IDENTITYDB library: the row matching your account is there in DB2 for i.
💡 All Identity components generated by the scaffolding are fully customizable. You can modify
Login.razor,Register.razor..., adjust password rules, disable email confirmation, add fields to the registration form... The components are located inComponents/Account/Pages/and are standard Razor.
What's next?
- CRUD with EF Core 8 - go further with EF Core on DB2 for i